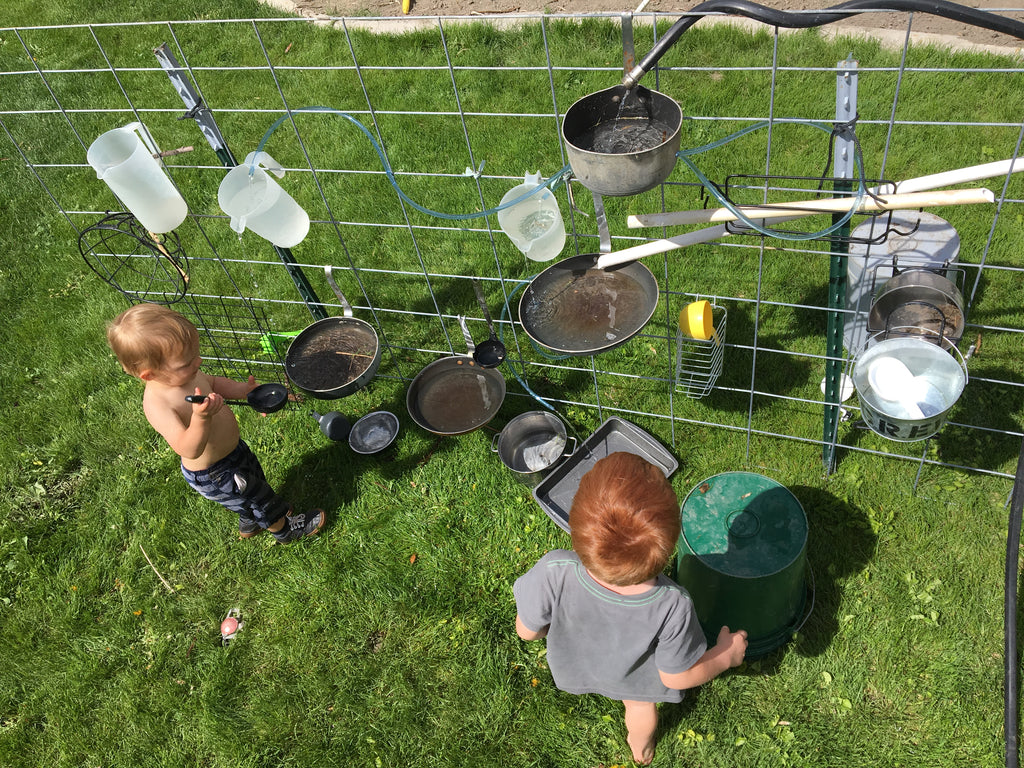

DIY Water-Flow Wall
We recently asked a lot of you what the biggest challenge was for getting your kids outside to play. We got a huge variety of responses, but a few were more popular than others. For a lot of people, heat is a major factor in the summer months, and for many others so are open-ended play options that still keep kids from wandering too far. We thought some in-depth, backyard, DIY, upcycling water play was exactly what you needed. Get out the sunscreen!
The following is a guide to making your unique DIY Water-Flow Wall. It is a mix of the principles behind water tables, sensory walls, mud kitchens, marble runs, and Rube Goldberg machines. Essentially it provides a water play area for children to invent and experiment while adjusting a slow, steady trickle of water.

As the water flows through paths your kids help create and gathers in pans at the bottom, they will have the opportunity to learn through sensory play, hone fine motor skills, problem solve, learn attention to detail, and be happily and safely engaged for hours. The Water-Flow Wall allows kids to teach themselves the principles of physics and is great for future STEM students! As they adjust the flow and paths for the water, they will grow to innately understand pressure, proportions, gravity, and the properties of liquids. Whether your child is a toddler, pre-schooler, or elementary school student, they will have a blast, and you will too, even as an adult!
Make sure to read the whole thing before you go off to make purchases! It might save you some money and extra trips for your unique water play area.
Supplies
Not every Water-Flow Wall will use all the following tools or materials, and many projects will include accessory elements.
Tools

- Sledgehammer
- Hammer
- Knife or Scissors
- Power Drill
- Drill Bits
- 3/8 to match 3/8 tubing
- 1/4 to match 1/4 tubing
- ~1/16 for freefall trickle holes
- A larger drill bit to deburr some of the holes you make
- Carriage Bolt
- Channel Locks or Vise Grips (one for each hand)
Beyond that, there are also the supplies you will be picking up! The biggest are the framework and stakes, but mostly it’s small stuff. A lot of these you can do without, so make sure to watch the video to better understand what you need for your unique project.
Materials

- Cattle Panel (the frame)
- T-Posts or Stakes
- Garden Hose
- 1/4 and/or 3/8 Plastic Tubing (15-20 FT)
- Small 1/4 or 3/8 Plugs (to fill unwanted holes)
- Rope and/or Zip Ties
- Thick Wire or Small Hooks
- Small Bolts, Nut, & Washers
- Midget One-Hole Straps
- PVC Pipe & Fittings
Upcycled Water Vessels
- Wide Pans & Deep Pots
- Flat Metal Handle with removable rubber grip allows the handle to be bent up with hook on the end
- Flat Metal Handle with molded plastic
- Pitchers - with open ended handle, so it can hang on the fence
- Ladles - bendable metal handle
- Measuring Cups - with metal handle
- Wireform Things - Optional
Putting it Together
Here are the steps for building you Water-Flow Wall
- Place Frame
- Modify your Materials to Hang
- Determine Placement
- Drill Holes
- Run the Hose and Have Fun!
Place Frame

There are a few options for your frame depending on your situation.
- Hammer stakes into lawn, then tie the panel on
- Attach panel to fence or wall
- Use a chain-link or similar fence
One tricky thing about your Water-Flow Wall is that the water and activity can have a detrimental effect on grass. There are a couple of ways to handle this.
- If staked, un-stake one side periodically and pivot your frame
- If attached to a fence or wall, periodically move it along the fence or wall
- Simply place your Water-Flow Wall in a stony or paved area
Modify Your Materials to Hang

This step requires a lot of creativity and problem-solving, so, of course, it's a lot of fun! Gather all your vessels together and get to work.
Here are a few guidelines for taking care of your differing materials:
- Pots, pans, and ladles with flat metal handles (sometimes covered with a rubber sheath) can be easily bent with vise grips or channel locks
- Handles that screw off often have short metal handles underneath. These are more difficult to bend and may require some creativity
- If you're having trouble with the vice grips and/or channel locks, try bracing the handles against a sidewalk and hammering them
- Use holes to attach wire or s-hooks, which you can then use to hang vessels. No holes? Drill one or two!
Remember: you'll probably want to make sure the vessels hang from the fence while holding the maximum amount of water, so handles will most likely need to be bent vertically first (parallel with the pot/pan's bottom) before you bend a hook onto the end.

You may have picked up some more unconventional vessels at the thrift store, like ice cube trays, that aren't easily hung upon your frame. If you have wire you have purchased or any wire-based platforms from the thrift store, they may be your solution. S-hooks can also be an easy fix. Play around with your options! This is also where your hooks, wires, midget one-hole straps, washers, and other small metallic bits can work. For this reason, you may want to start modifying materials before you go to the hardware store, so you have an idea of what you need.
The solution may not be the first thing you think of, but it may be better then what you originally envisioned. Don't be afraid to use your drill to make holes from which to hang things!
Determine Placement
After your things are modified to hang on your frame you can design your set-up. There are a few principles to keep in mind for this process.
1. Start Big End Big
In general, you will want to have a larger pot up top and a couple of larger pans on your bottom row. The vessel up top is your reservoir for the water flowing through your whole system. Ideally, you will have a water trickle that provides exactly how much the rest of your wall needs, but you can have some wiggle room with a vessel that has a large volume. Also, this allows easy and effective recycling of water from the bottom as well as a cool down time when your hose is turned off. The larger pans on the bottom collect this water that children can recycle throughout the wall or use as they please to experiment with new portions.

2. Make Sure Your Design Matches the Flow
In your zeal of creating an interesting Water-Flow Wall, you may lose track of what to expect from your water flow. Remember that water will be delivered at a speed related to your hole and/or tube size as well as the weight of water reserves further pushing it down. You may find (and your child may find as they experiment) that some arrangements will not go as planned over time, with some vessels running out of water or just flowing at a low rate. To avoid this, carefully consider how much water you have flowing in and out of vessels. Those amounts should almost match.
Drill Holes
When you have your design figured out, it is time to create your channels for water flow. For any paths you plan on using a tube to guide, make sure your bit matches the width of the tube, e.g. 1/4 inch tube with 1/4 drill bit. Usually, you'll want the 1/16 drill bit for tubeless, sprinkling streams.

Drilling can be dangerous, so take precautions. You'll want safety glasses when you are drilling metals, and under no circumstances should you let small children use the drill. This is the grown-up part. Also, be careful of any materials left over when you drill. The metal refuse is more dangerous, but you'll want to keep track and dispose of all of it to prevent harm to people or animals.
Run the Hose and Have Fun!
Weave your hose through the top of your frame to keep it in place, adjust the flow to match your demand, and let your kids have at it! Offer assistance when your child needs it, but let them solve their own problems too. While you will obviously want to supervise, your child can have hours of fun playing with their DIY Water-Flow Wall.

Let us know what you think!